

搜索到
9
篇与
的结果
-
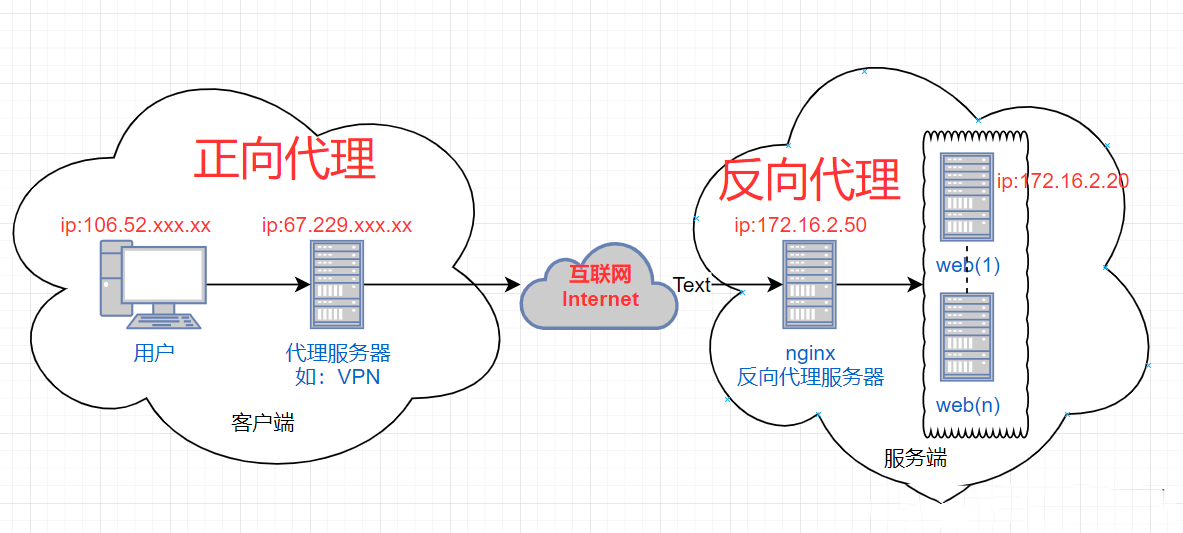
 反向代理管理器——Nginx Proxy Manager 操作系统debian1、安装 Docker 和 Docker-Compose一键安装docker curl -sSL https://get.docker.com/ | shDocker-compose 一键安装curl -L "https://github.com/docker/compose/releases/download/1.24.1/docker-compose-$(uname -s)-$(uname -m)" -o /usr/local/bin/docker-compose给执行权限chmod +x /usr/local/bin/docker-compose创建软链ln -s /usr/local/bin/docker-compose /usr/bin/docker-compose查看docker-compose版本docker-compose version2、部署NginxProxyManager服务在docker目录下创建一个npm文件夹/var/lib/docker/npm在npm文件夹下创建一个的docker-compose.yml文件version: '3' services: app: image: 'chishin/nginx-proxy-manager-zh' restart: unless-stopped ports: - '80:80' - '81:81' - '443:443' volumes: - ./data:/data - ./letsencrypt:/etc/letsencrypt也可以直接下载代替 docker-compose.yml 修改后执行命令cd /var/lib/docker/npm3、运行docker-compose up -d如果使用的是 docker-compose-plugindocker compose up -d在浏览器地址输入 http://ip:81 这里的 ip 是你服务器的 ip账号:[email protected]密码:changeme本机ip反代地址:172.17.0.1
 -
nat机 ovz开启bbr加速 提供两种bbr加速适合ovz机子1.执行ldd --version看看自己的 gcc 版本,大于等于 2.14 就可以跳过本步。直接执行第 3 步,如果是低于 2.14 版本的,还需要执行如下指令手动编译安装高版本的:wget https://ftp.gnu.org/gnu/glibc/glibc-2.15.tar.gz wget https://ftp.gnu.org/gnu/glibc/glibc-ports-2.15.tar.gz tar -zxf glibc-2.15.tar.gz tar -zxf glibc-ports-2.15.tar.gz mv glibc-ports-2.15 glibc-2.15/ports mkdir glibc-build-2.15 cd glibc-build-2.15 ../glibc-2.15/configure --prefix=/usr --disable-profile --enable-add-ons --with-headers=/usr/include --with-binutils=/usr/bin make all && make install安装 BBRwget https://raw.githubusercontent.com/kuoruan/shell-scripts/master/ovz-bbr/ovz-bbr-installer.sh chmod +x ovz-bbr-installer.sh./ovz-bbr-installer.shlkl-linux+haproxy hack 版本 bbrplus,在 OpenVZ 工作良好。2.第二种比较简单注意: 需要开启 TUN/TAP 和至少 256M 空闲内存。支持 Alpine / Debian / Ubuntu / CentOS执行wget --no-cache -O lkl-haproxy.sh https://github.com/mzz2017/lkl-haproxy/raw/master/lkl-haproxy.sh && bash lkl-haproxy.sh
-
甲骨文 arm dd安装Debian 11系统 arm处理器不支持CentOS系统,Ubuntu不太想用,于是就想如何DD其他系统。比如Debian系统,本文代码如下:更新apt源apt-get update安装需要的工具包apt-get install -y xz-utils openssl gawk file然后执行以下脚本,脚本全自动运行,断开链接后耐心等待Debian11bash <(wget --no-check-certificate -qO- 'https://moeclub.org/attachment/LinuxShell/InstallNET.sh') -d 11 -v 64 -a -firmwareDD安装完毕之后,请立即更新密码。默认用户名为:root,默认密码为:MoeClub.org机器配置Debian/Ubuntu/CentOS目前甲骨文有两种框架的机型AMD和ARM两种框架的网卡名称是不一样的,注意分辨即可输入以下命令重新获取IP地址:AMD 框架dhclient -6 ens3ARM 框架dhclient -6 enp0s3使用以下命令测试IPv6通信是否正常;ping6 ipv6.google.com注意:机器重启后IPv6会失效,再次输入以上命令即可重新获取。如果是Ubuntu/Debian系统,想要开机自启动可以编辑interfaces文件,手动开启Dhcp。配置开机自动获取IPv6地址编辑interfaces文件:nano /etc/network/interfaces在文本最后面添加:iface xxx inet6 dhcp上面的xxx看一下文本里小框框里面是啥(如下图),就更换成啥。我这里是enp0s3,所以我在最后面添加的就是iface enp0s3 inet6 dhcp,enp0s3是我服务器的网络接口。每个服务器的接口名字都有所不同。看着自己文本上面那个接口输入就行了。最后ctrl+x保存,y确认。最后reboot重启。开机后的系统就可以自动获取到ipv6地址了查看ipv6地址:ip -6 route showping测试ipv6是否通畅:ping ipv6.google.com可以ping通就说明一切就绪!修改系统dns,实现v4v6双栈dns解析虽然只设置ipv4 dns也可以解析网络,但是我们ipv6地址都有了,设置一下ipv6 dns更加完美nano /etc/resolv.conf在最后添加一行,如下图nameserver 2001:4860:4860::8888root用户代码如下sudo -iecho root:12345678 |chpasswd rootsed -i 's/^#\?PermitRootLogin.*/PermitRootLogin yes/g' /etc/ssh/sshd_config;sed -i 's/^#\?PasswordAuthentication.*/PasswordAuthentication yes/g' /etc/ssh/sshd_config;service sshd restart默认密码是: 12345678登录后一定要修改密码!密码修改命令:passwd、直接创建 Oracle VPS 时使用命令创建oracle实例的时候,在最下面的”管理“菜单中找到初始化脚本行,粘贴以下命令,则在创建后直接可以使用root账号登录VPS,登录的密码是 yourpassword ,所以使用以下命令行记得改成你自己的密码!#!/bin/bash echo root:yourpassword |sudo chpasswd root sudo sed -i 's/^#\?PermitRootLogin.*/PermitRootLogin yes/g' /etc/ssh/sshd_config; sudo sed -i 's/^#\?PasswordAuthentication.*/PasswordAuthentication yes/g' /etc/ssh/sshd_config; sudo service sshd restart
-
cloudreve网盘搭建 大硬盘vps安装cloudreve网盘所需代码1.bebian系统更新系统环境apt update -y && apt install -y curl && apt install -y socat && apt install wget -y打开端口iptables -P INPUT ACCEPT iptables -P FORWARD ACCEPT iptables -P OUTPUT ACCEPT iptables -FBBR开启wget --no-check-certificate https://github.com/teddysun/across/raw/master/bbr.sh && chmod +x bbr.sh && ./bbr.sh装宝塔面板 建议安装国内版降级wget https://raw.githubusercontent.com/AaronYES/aaPanel/main/script/aapanel.sh -O aapanel.sh && chmod +x aapanel.sh && clear && ./aapanel.sh2.下载安装cloudreve网盘GitHub官方地址 (https://github.com/cloudreve/Cloudreve)cloudreve/Cloudreve: 🌩支持多家云存储的云盘系统 (Self-hosted file management and sharing system, supports multiple storage providers) (github.com)也可以用命令安装解压获取到的主程序(自己去看版本号)wget https://github.com/cloudreve/Cloudreve/releases/download/3.8.0/cloudreve_3.8.0_linux_amd64.tar.gztar -zxvf cloudreve_3.8.0_linux_amd64.tar.gz赋予执行权限 chmod +x ./cloudreve启动 ./cloudreve3.下载cloudreve.service文件上传到vps下 /usr/lib/systemd/system/cloudreve.service下载 更新配置systemctl daemon-reload启动服务systemctl start cloudreve设置开机启动systemctl enable cloudreve4.离线下载组件组件环境apt install wget curl ca-certificates下载脚本wget -N git.io/aria2.sh && chmod +x aria2.sh运行脚本./aria2.sh
-
常用脚本备份 安装重装系统的前提组件:Debian/Ubuntu:apt-get install -y xz-utils openssl gawk file wget screen && screen -S osRedHat/CentOS:yum install -y xz openssl gawk file glibc-common wget screen && screen -S os如果出现异常,请刷新Mirrors缓存或更换镜像源。RedHat/CentOS:yum makecache && yum update -yDebian/Ubuntu:apt update -y && apt dist-upgrade -y使用:wget --no-check-certificate -O NewReinstall.sh https://git.io/newbetags && chmod a+x NewReinstall.sh && bash NewReinstall.sh41合一系统密码:1、CentOS 7.7 (已关闭防火墙及SELinux,默认密码Pwd@CentOS)2、CentOS 7 (默认密码cxthhhhh.com)3、CentOS 7 (支持ARM64、UEFI,默认密码cxthhhhh.com)4、CentOS 8 (默认密码cxthhhhh.com)5、Rocky 8 (默认密码cxthhhhh.com)6、Rocky 8 (支持UEFI,默认密码cxthhhhh.com)7、Rocky 8 (支持ARM64、UEFI,默认密码cxthhhhh.com)8、CentOS 9 (默认密码cxthhhhh.com)9、CentOS 6 (官方源原版,默认密码Minijer.com)10、Debian 11 (官方源原版,默认密码Minijer.com)11、Debian 10 (官方源原版,默认密码Minijer.com)12、Debian 9 (官方源原版,默认密码Minijer.com)13、Debian 8 (官方源原版,默认密码Minijer.com)14、Ubuntu 20.04 (官方源原版,默认密码Minijer.com)15、Ubuntu 18.04 (官方源原版,默认密码Minijer.com)16、Ubuntu 16.04 (官方源原版,默认密码Minijer.com)17、Windows Server 2022 (默认密码cxthhhhh.com)18、Windows Server 2022 (支持UEFI,默认密码cxthhhhh.com)19、Windows Server 2019 (默认密码cxthhhhh.com)20、Windows Server 2016 (默认密码cxthhhhh.com)21、Windows Server 2012 (默认密码cxthhhhh.com)22、Windows Server 2008 (默认密码cxthhhhh.com)23、Windows Server 2003 (默认密码cxthhhhh.com)24、Windows 10 LTSC (默认密码Teddysun.com)25、Windows 10 LTSC (支持UEFI,默认密码Teddysun.com)26、Windows 7 x86 Lite (默认密码nat.ee)27、Windows 7 x86 Lite (阿里云专用,默认密码nat.ee)28、Windows 7 x64 Lite (默认密码nat.ee)29、Windows 7 x64 Lite (支持UEFI,默认密码nat.ee)30、Windows 10 LTSC Lite (默认密码nat.ee)31、Windows 10 LTSC Lite (阿里云专用,默认密码nat.ee)32、Windows 10 LTSC Lite (支持UEFI,默认密码nat.ee)33、Windows Server 2003 Lite (C盘默认10G,默认密码WinSrv2003x86-Chinese)34、Windows Server 2008 Lite (默认密码nat.ee)35、Windows Server 2008 Lite (支持UEFI,默认密码nat.ee)36、Windows Server 2012 Lite (默认密码nat.ee)37、Windows Server 2012 Lite (支持UEFI,默认密码nat.ee)38、Windows Server 2016 Lite (默认密码nat.ee)39、Windows Server 2016 Lite (支持UEFI,默认密码nat.ee)40、Windows Server 2022 Lite (默认密码nat.ee)41、Windows Server 2022 Lite (支持UEFI,默认密码nat.ee)99、自定义镜像腾讯云删除监控组件PS:如果你是腾讯云记得卸载组件 否则会导致报错 DD失败 systemctl stop tat_agent systemctl disable tat_agent rm -rf /etc/systemd/system/tat_agent.service rm -fr /usr/local/qcloud ps -A | grep agent检查看是否还有腾讯云组件 kill 这个进程41合一脚本(可DD windows)https://git.beta.gs/wget --no-check-certificate -O NewReinstall.sh https://git.io/newbetags && chmod a+x NewReinstall.sh && bash NewReinstall.sh如为CN主机(部分主机商已不能使用),可能出现报错或不能下载脚本的问题,可执行以下命令开始安装wget --no-check-certificate -O NewReinstall.sh https://cdn.jsdelivr.net/gh/fcurrk/reinstall@master/NewReinstall.sh && chmod a+x NewReinstall.sh && bash NewReinstall.sh宝塔面板7.7.0curl -sSO https://raw.githubusercontent.com/8838/btpanel-v7.7.0/main/install/install_panel.sh && bash install_panel.sh1,屏蔽手机号sed -i "s|bind_user == 'True'|bind_user == 'XXXX'|" /www/server/panel/BTPanel/static/js/index.js2,删除强制绑定手机js文件3,手动解锁宝塔所有付费插件为永不过期文件路径:/www/server/panel/data/plugin.json搜索字符串:rm -f /www/server/panel/data/bind.pl4,给plugin.json文件上锁防止自动修复为免费版chattr +i /www/server/panel/data/plugin.json*单线程测试剑皇脚本wget https://github.com/maintell/webBenchmark/releases/download/0.6/webBenchmark_linux_x64 chmod +x webBenchmark_linux_x64./webBenchmark_linux_x64 -c 32 -s https://target.url https://archives.vip/10.html bash <(curl -Lso- https://bench.im/hyperspeed)性能测试Geekbench 5curl -sL yabs.sh | bash -s -- -iGeekbench 4curl -sL yabs.sh | bash -s -- -fi4三网回程路由测试curl https://raw.githubusercontent.com/zhanghanyun/backtrace/main/install.sh -sSf | sh一键安装docker curl -sSL https://get.docker.com/ | sh卸载dockerapt-get remove docker docker-engine rm -fr /var/lib/docker/Docker-compose 一键安装国外机:sudo curl -L "https://github.com/docker/compose/releases/download/2.17.2/docker-compose-$(uname -s)-$(uname -m)" -o /usr/local/bin/docker-compose sudo chmod +x /usr/local/bin/docker-composeVPS 开放所有端口(适合甲骨文 ARM Ubuntu 系统)iptables -P INPUT ACCEPT iptables -P FORWARD ACCEPT iptables -P OUTPUT ACCEPT iptables -F apt-get purge netfilter-persistentspeedtest-cli网络测速wget https://install.speedtest.net/app/cli/ookla-speedtest-1.2.0-linux-x86_64.tgz && tar -zxvf ookla-speedtest-1.2.0-linux-x86_64.tgz && rm -rf ookla-speedtest-1.2.0-linux-x86_64.tgz speedtest.* && ./speedtest宝塔wget -O install.sh https://install.baota.sbs/install/install_6.0.sh && bash install.sh